
What the heck is Datamerge, why should you use it, and how does it work?
What Is Datamerge
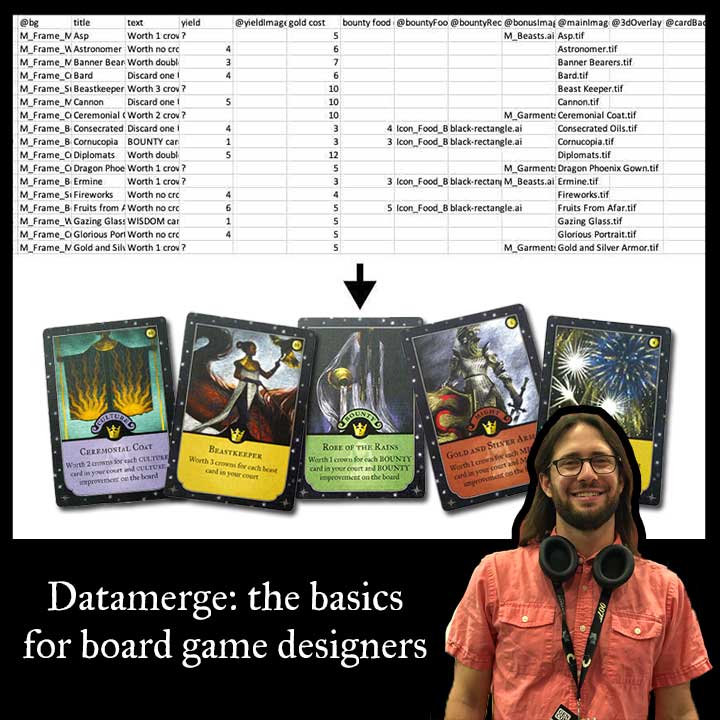
Datamerge is a tool for Adobe InDesign, Adobe’s publication layout program. Datamerge lets you manage spreadsheets of card data and then, with a single click, turn them into a file that contains all of your game’s cards. Datamerge and InDesign are professional grade tools—ultimately we at Resonym use Datamerge to create our final print files for our games, the ones we send to the manufacturer. That said, Datamerge can also be handy for designers, although note that there are some cheaper alternatives out there.

The concept is simple, and started as a way to make easy mailing labels (the equivalent tool to Datamerge in Microsoft products is actually called Mailmerge). For the mailing label example, imagine you had 500 addresses you wanted to print mailing labels for. The addresses are in a spreadsheet where each column is one of the fields in the address (mailing name, street address, postal code, city, state, etc.) and each row is one person’s address. In InDesign, all you’d have to do is lay out a single address, and then use the Datamerge tool to link the spreadsheet in. Then, you tell InDesign where each of the column data goes (e.g. first use the name column, then a line break, then the street address, etc.). Finally, you press the merge button and get sheets of 500 printable mailing labels!
For game designers, we almost always use Datamerge for making cards. So the fields in the spreadsheets are things like “Card name,” “cost,” “card strength,” and even “art”—you can tell Datamerge to place an art file by giving it the file name!
Why Use Datamerge
Designers’ first prototypes should be rough paper ones where you easily scratch out numbers and change them as needed. But as your game comes together and you’re sure that it’s worth making, your prototypes will have to get prettier (whether that’s because you’re going to publish it yourself or pitch it to other publishers). You’ll eventually have to make your prototype’s files digitally… but your design is never done, and you’ll be playtesting and tweaking even after making your nice prototype files (this is especially true in the age of COVID where we often have to playtest online from the very first prototype).
This is where Datamerge comes in. If your game has more than 10 cards, it becomes quite the chore to quickly make changes to your prototype: you end up slogging through each card design in Photoshop or Illustrator and making tiny changes, only to do it again next week. Datamerge lets you skip the tedium. You make your changes in your spreadsheet, press the merge button, and presto! Cards are ready! And if you decide to change the layout of your cards, same deal—just change it in one place and press “Merge” instead of having to change every single card.
That’s the big reason, but there are a number of other important reasons to use Datamerge:
- Card Arrangements – Changing the arrangement of your final files is a cinch using the Datamerge options menu. Every print shop wants a different card layout. You want 8.5×11 sheets of cards in a grid to print at home. Drivethrucards wants PDFs of single fronts and single backs alternating. Tabletop Simulator wants a grid of card faces with no margins. Your professional manufacturer wants single fronts in one file with no backs. It’s trivial to use the same files and Datamerge and generate all of these results!

From upper left to bottom right: print at home format, Tabletop Simulator format, small run print shop format, manufacturer format
- Power of Spreadsheets – Making your cards in spreadsheets allows you power that you wouldn’t have otherwise. For example, you can write equations in the spreadsheet to generate costs for your cards from their various strengths. And if those don’t feel balanced, you can easily adjust the equations and merge again!
- Collaboration – It’s often hard to collaborate in professional-grade software like the Adobe Suite. Between everyone needing the expensive software and having a ton of version control issues, you often have to leave it all to one person. With Datamerge, you and your design partners can make edits to a Google Sheet in real-time with each other, with Google’s built-in version history, and only then have to touch InDesign to do the final merge. You can also easily copy the spreadsheet if you, for example, want to share it with a fan who wants to do a fan translation of the card text—they don’t need fancy software, and you don’t need to riskily share your print files with them.
How To Use Datamerge
There are a number of great tutorials out there, so I’m just going to cover the basics here (I’ll be covering some advanced tricks in a future post). For this tutorial, I’m going to assume that you’re making a layout for Tabletop Simulator upload. I’ll mark the TTS-specific segments with “(TTS).”
Here you can download some example files for a Monarch card Datamerge.
Step 1: Make Your Card Layout – Look at monarch_court_card_datamerge_template.indd
 Create a new InDesign document. (TTS:) Make the page size exactly equal to the width of 10 of your cards, and as tall as you need. So if you have 12 cards at 2.5 inches x 3.5 inches, make your document 25 inches x 3.5 inches (that’s a grid of 10 cards wide by 2 tall). TTS has a max of 70 cards, where 10 is the max row length and 7 the max column height, after which you’ll need to upload multiple pages.
- Create a frame at the size of a single card, 2.5 x 3.5 in. (If you need a different aspect ratio of card that’s fine, but 2.5 x 3.5 is standard poker size)
- Create text frames for each of the parts of text that appear on your card. To help with your layout, fill each text frame with the longest text from your cards. E.g. for the name text frame, fill it with the longest name that any of your cards has. Do the same for the ability text, etc.
- Different text types from your spreadsheet will be able to share the same text frame. For example, you could have the ability text and the flavor text share the same text frame. You can even style them differently.
- Import any shared images using the File → Place tool. If all of your cards have the same card frame or border, or they all share an icon that goes under the cost of the card, there’s no need to Datamerge these in, you can just import them.
- Create plain frames (not text frames) for your images. These are where the images go. This is most useful for card art, but it can also be used for other things like card borders, if only some of the cards use the asset.
- Lay them out! Within your original 2.5 x 3.5 in frame, drag and resize your frames to be in the right place on your card. Style your dummy text appropriately. You can you resize, change fonts, and add styling for each of your dummy texts, and when you bring in your Datamerged text it will keep the styling. Layer order matters as it would normally.
- IMPORTANT: at this point, all of your assets should be contained within your original frame location-wise. If you have anything poking outside the frame, the merge isn’t going to work as you intend.
- Finally, add another 2.5 x 3.5 in frame and align it on top of your card (exact size). You’ll want this for the back of the card, for merging arrangements that require a card back.
- Save your InDesign file as gamename-datamerge-template (or whatever you want) in its own folder.
Step 2: Make Your Spreadsheet – Check out this Google Sheet
- Make a Google Sheet. Seriously, it’s much easier to use Google Sheets over Excel here, even if you’re not collaborating. You can use Excel if you must.
- Put a name for each column in the top cell of that column. The name should be an identifier for the text or image that is going into your layout. Each image and each styling of text should have its own column. For example, “Card Name,” “Cost,” “@Art,” “Ability Text,” and “Flavor Text” should have their own columns, even if Ability Text and Flavor Text share a text frame. NOTE: all image column headers should start with “@”. EDIT: Excel doesn’t like starting a column with @, but Jeppe Norsker mentioned in the Card and Board Game Designers group that you can add an apostrophe before the @ to solve this problem.
- Feel free to add extra columns for notes, or calculations. Not every column needs to go in the Datamerge
- Now fill in each row with info for a single card!
- Notes about images: image columns will need the name of the image you want to merge in, including its file type. InDesign can easily handle standard images (JPG, PNG including transparency), as well as Adobe file types (AI, PSD). EDIT: Other folks have had success using file paths (like putting your images in a folder called “images” and then making the file path “images/icon.png” for Windows, or “images:icon.png” for Mac). I work on a mac and have never been able to get this to work, so I just put the name of the image and then put the image itself in the same folder as the InDesign document.
- Notes about blanks: you can leave a cell blank if that card, for example, has no Ability Text. Sometimes you’ll want to actually have a blank in your final document. You can’t leave all the cells in a row blank or InDesign will just skip it. The solution is to put blank.jpg in one of your image columns. When you go to do your merge, InDesign will throw an error like “We can’t find blank.jpg”. You just click okay and you’ll be left with a blank spot in your sheet! If the error bothers you, you can make a white image and name it blank.jpg.
- When you’re ready, go to File → Download → Comma-separated Values (.csv), download the file, and move it to the same folder as your InDesign file
Step 3: Run The Datamerge
 Back in your InDesign file, go to Window → Utilities → Datamerge to open the Datamerge panel.
- In the Datamerge panel, click the “hamburger” menu (a bunch of little horizontal lines) in the upper right corner and select “Select Data Source,” then choose your csv spreadsheet that you downloaded.
- Now you should see a list of your column headers in the Datamerge panel, with a little icon to indicate which ones are text and which are images. Hooray!
- For each image, select the frame you intend to put it in, and then single click the column header in the Datamerge panel. The frame will change to show the (truncated) header text, and in the Datamerge panel, the header will now have “1” next to it, showing that it’s been placed in 1 location.
- For each text section, select your dummy text using the text tool. Then click the column header for that text section in the Datamerge panel. The dummy text will be replaced with the header wrapped in angle braces, e.g. <Card Name>, and the header will have a “1” appear next to it as well. Note that however the header name is styled is how the text will be styled when you run the merge.
- Save your template! Now you’re ready to run the merge. Press the icon with an arrow and a rectangle, which is just under the hamburger menu in the Datamerge panel. This will open the merge options.
- Records: this tab of the merge options is where you can specify if you want to only merge some of your cards. The most important option here is Single Record vs Multiple Record. If you want a PDF that has each card face on its own page, you want Single Record layout. (TTS:) We want as many cards as will fit, so choose Multiple Record.
- Multiple Record Layout: this tab has controls for how it places the cards on the page. (TTS:) We don’t want any margins, so set the margins to 0. If you were printing these at home, you’d want margins (margins are how far the cards are from the edge of the page). For spacing, make sure there’s 0px between rows and columns. This is rarely a desirable thing to increase; if you’re printing at home, you want the cards next to each other. If you’re uploading to TTS, you still want them next to each other.
- Options: this tab mostly has controls for how it places images. The defaults are usually fine. Don’t change anything here.
- Preview Multiple Record Layout: in the bottom left corner there is a checkbox for Preview/Preview Multiple Record Layout. This theoretically shows you what your layout is going to look like, but at least in earlier versions of InDesign this had a nonzero chance of making your merge not work properly and not be fixable—I would have to move all of my assets to a fresh new file and try again. It’s probably fixed now… but I don’t want to tempt fate so I never preview.
- Now you’re ready to merge! Press “Okay” and see what your resulting file looks like. It may take you a few tries to get it right.
 That’s it! One of the most powerful game publishing tools you’ll ever learn! As always, come join the Resonym Discord server if you want to chat about game design, publishing, or just want some help troubleshooting your Datamerge.
Stay tuned for an upcoming post about some expert tricks we’ve learned (EDIT: here’s the expert tricks post!).
—Max
By the way, if you’re reading this please do me a favor and go and vote for the ability to Datamerge straight from Google Sheets without downloading on this Adobe suggestion thread: https://indesign.uservoice.com/forums/601021-adobe-indesign-feature-requests/suggestions/33364798-make-data-merge-possible-from-google-sheet-without#comments
These votes actually work! We didn’t used to be able to Datamerge icons directly into text, and thanks to a voting thread they implemented the feature!